


Catalog Help
Welcome to the SSJCPL library online catalog!
To get started, choose one of following topics.
- Finding My Way Around
- Using the Library Main Catalog Home Page
- Browsing Featured Collections
- Searching the catalog
- Working With Search Results
- Limiting Search Results
- Viewing More Details of a Title
- Managing My Account
- Accessing My Lists
- Placing Holds
Finding My Way Around
Navigating
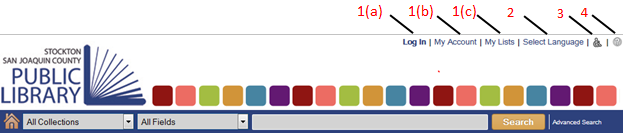
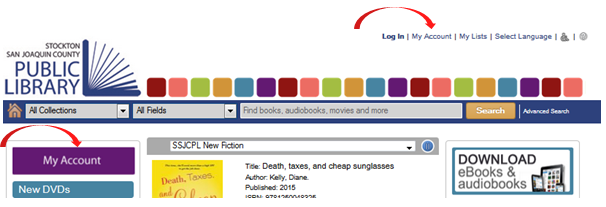
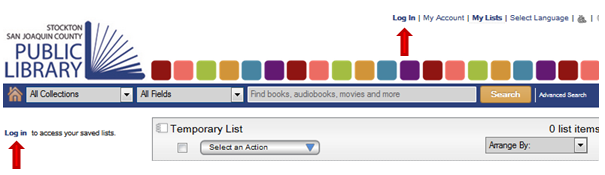
- Navigation links are in the upper-right corner of the header (see image above).
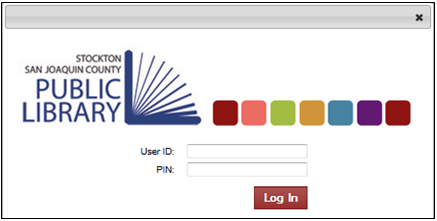
- Click on Log In(1(a)) link and enter your library card and pin numbers (check with the reference staff if you don’t remember it) at the prompt.
- Once you're successfully logged in, your name will be displayed on the left of the navigation links. After that, you can do the followings without having to enter your library card again.
+ Place a hold (see Placing Holds) on any title while browsing or searching the library catalog
+ Manage your account by clicking on My Account(1(b)) link (see Managing My Accounts) to view your Personal Information, Checkouts, Holds, and Fines or to renew your checkouts online)
+ Access My Lists1(c) page and view or edit your list(s) (see Accessing My Lists)
Selecting a language
Point to Select Language (2) link and select a language (English or Spanish) from the drop-down. If you already set your default language in the My Account(1(b)) preferences, it would automatically display the web page in your preferred language (see Preferences).
Keyboard Navigation (ADA mode)
The standard library catalog interface is made to be accessed primarily with a mouse. However, if you are more comfortable using the keyboard, you can click on the ADA link (3) to change to that interface.
Help Page
Click on the help link (4) to access this Catalog Help page.

Using the Library Main Catalog Home Page
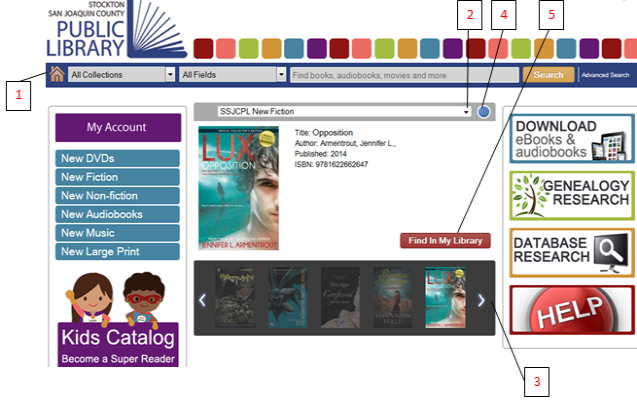
(1) The Home Button – take you back to the main catalog home page, which is the very first page you see when you access the online catalog website.
(2) The Book (Themed) Lists
- The default themed list is the SSJCPL New Fiction.
- Click on the arrow (2) to view other themed lists from the drop-down menu and select one.
- The selected themed list titles will be displayed on the book river as a slideshow(3).
(3) The Book River
- Details (author, ISBN, etc.) of the highlighted book title from the book river will be displayed in between the themed list title and the book river.
- Click on the pause button (4) to stop the book river from slideshow.
- Click on the button “Find In My Library” (5) to search for the title and its availability at your library.
Browsing Featured Collections
New collections
- Certain new collections - DVDs, Fiction, Non-Fiction, Audiobooks, Music, and Large Print - are featured on the left panel of the main catalog home page.
- Click on one of those buttons to view a list of new titles for a specific collection.
- The results page will be displayed, and you can view more details for a particular title (see Viewing More Details of a Title) or select any options that are available on that page (see Working With Search Results).
Kids Collections
- Click on the Kids Catalog button, located right below the new collections' buttons, to view or search for only titles in Juvenile collections.
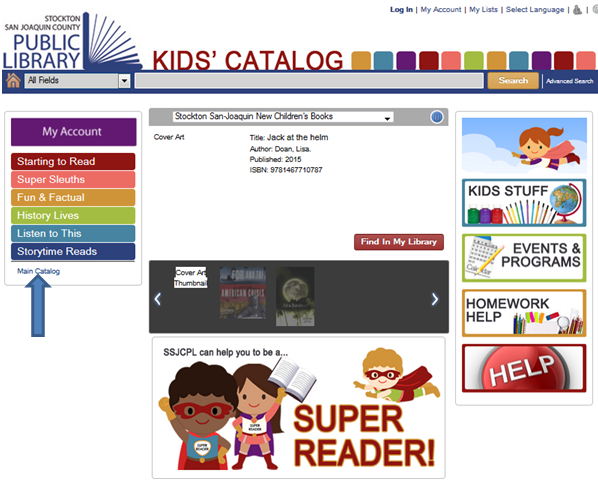
- Browse the kids' featured collections on the left panel, kids' themed lists in the middle, and kids' electronic resources and library events and programs on the right.
-
Search any juvenille titles by typing in your search term(s) in the search box at the center top bar.
-
If your search includes titles in the teen or adult collections, you will not see them while you're searching the Kids' Catalog page. You need to click on the Main Catalog link (see the blue arrow on image above) to go back to the main catalog home page. (click here to open the kids' catalog page)
Electronic Resoures (eResources) - located on the right panel of the main catalog home page
- DOWNLOAD eBooks & audiobooks button
+ If you’re interested in browsing eBooks and eAudiobooks collection, click on this button, and you will be redirected to the SSJCPL eBooks|eAudiobooks page.
+ On this page, select the OverDrive button to browse the library OverDrive collection.
- GENEALOGY RESEARCH button
Selecting this button will take you to the SSJCPL genealogy page where you can find resources to help you with your family history questions.
- DATABASE RESEARCH button
This button will take you to the SSJCPL databases.
- HELP button
Click on this button to access the Catalog Help page.
(Click here to open the main catalog page)
Searching the Catalog

Using basic searching
- In the search box (1), type a book/movie title or search term(s) and press the “Enter” key. The search results page will be displayed.
Searching with filters
- Click on (2) to select a specific library branch (Chavez, for example), audience, or material type (book, audiobook, or dvd) from the drop-down menu.
- Click on (3) to narrow your search term(s) to a particular field (Title, Author, Subject, etc.) in the catalog records.
Using advanced search
- If you want more search options to help you find exactly what you're looking for, click the Advanced Search (4) to go to the Advanced Search page.
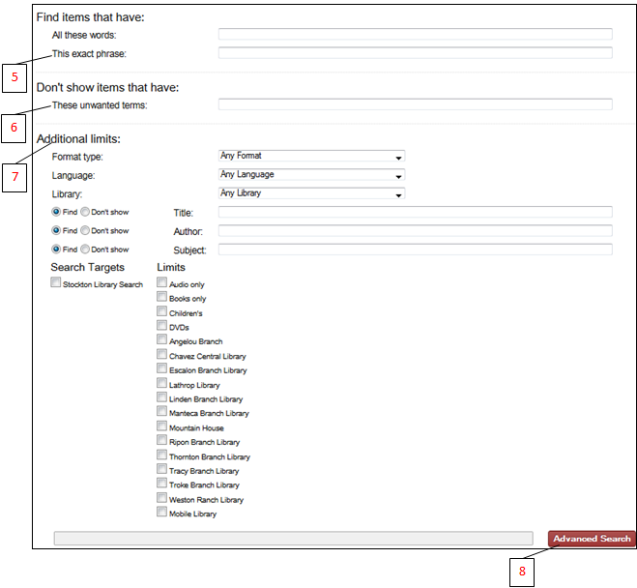
- With Advanced Searching, you can search exact phrases (5) or exclude terms from your search (6). For example, if you wanted to do a search on potters but did not want results for "Harry Potter," you could search the term "potter" and enter "Harry" in the unwanted terms box.
- You can also apply any combination of limits on your search with Additional limits (7), including format type, language, location, fields, availability, and targets.
- Once you have set up your search with the terms and limits you want, click the Advanced Search (8) button to get your search results.
Note: While there are many options to limit your search, there is the likelihood that selecting too many limits will not return any search results.
Working With Search Results
You can refine or narrow down your search results using the facets on the left hand side of the screen (see Limiting Search Results).
View options
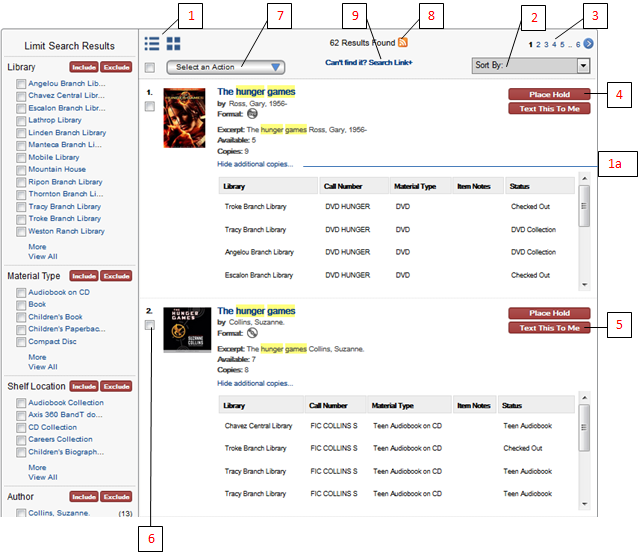
There are two view options for your search results. Click any of these icons (1) to change the view.
+ In list view (default display – see image above), details of the result titles are displayed, including their locations and availability, which you can hide by clicking on Hide additional copies link (1a).
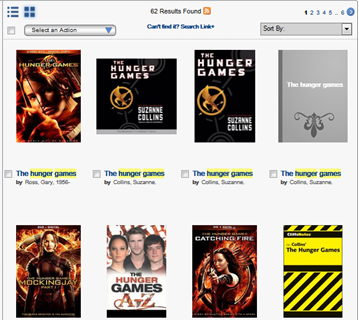
+ In thumbnail view, only the result titles, authors, and their cover images (see image below) are displayed.
Sorting search results
Click on the “Sort by” option (2) at the upper right corner to sort the search results by
+ Relevance (Default)
+ Publication date (Ascending or Descending)
+ Title
+ Author
Paging (3)
Click on the page number to go to a specific page or the right arrow to go to the next page and the left arrow to go to the previous page of search results.
Placing a hold
- Click on Place Hold button (4) on the right to place a hold on a specific title. (For more information, see Placing holds.)
- To place holds on multiple titles at the same time, follow the steps in Selecting an action.
- Click on Text This To Me (5) button if you want to send a particular title to your mobile phone.
- From the pop-up window,
+ Enter your mobile number and carrier as shown on image below.

+Click on Text This To Me button at the bottom left of the window.
- To send a text on multiple titles at the same time, follow the steps in Selecting an action.
- Select the title(s) you want from the search results page by checking the box(es) (6) on the left of the title(s)
- Click on Select an Action button (7)

- Select one of the following actions from the drop-down menu
Note: you can only select titles from the same page.
Saving searches as RSS feeds
You can subscribe to the RSS feed if you want to receive updates for your specified searches as RSS feeds.
- Click on the RSS feed button (8).
- Click on the Subscribe button to save your search using Live Bookmarks (default).
Note: To take advantage of RSS feeds, you must have an RSS enabled browser or an RSS reader.
Searching Link+
If you can’t find any title in the SSJCPL catalog, you can search the Link+ system, which includes all participating libraries in the states of California and Nevada, by clicking on Can’t find it? Search Link+ (9) link.
Limiting Search Results
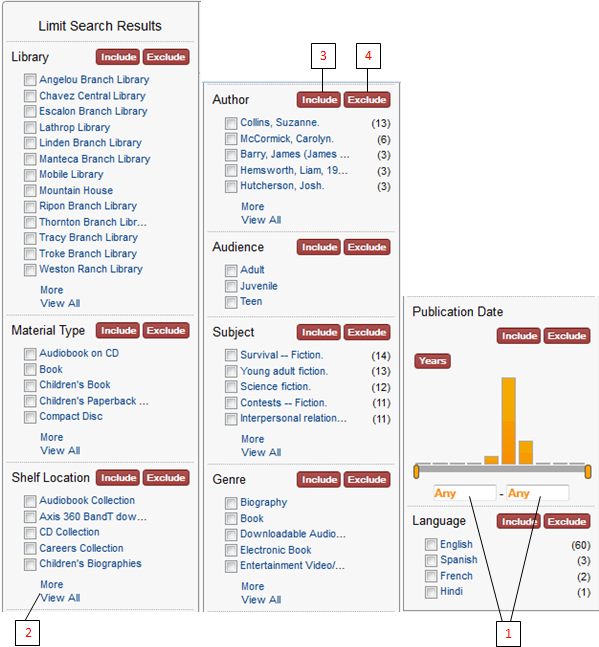
Using the facet(s)
- You can refine your search results by using one or more facets (a list of attributes that relate specifically to your search) - Library, Material Type, Shelf Location, Author, Audience, Subject, Genre, Publication Date, and Language - located on the left panel of the search results.
+ Check one or more boxes from any of these facets as needed, or enter the year range (1) for Publication Date facet. (For example: 2005 – 2015)
+ Click More or View All option (2) at the bottom of a facet if available to view the rest of the options.
+ Click Include (3) or Exclude (4) button. You must click one of these buttons for the search results to take effect.
- Your facet selection will appear at the top of the Limit Search Results panel under the “Narrowed by” section (see black arrows from image below).
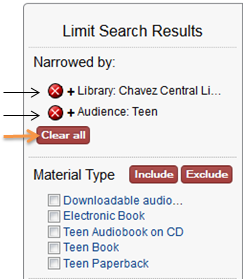
Removing selected facet(s)
- Click on the red x button(s) (see black arrows from image above) to remove a particular selected facet.
- Click on the Clear all button (see the orange arrow from image above) to remove all selection.
Viewing More Details of a Title
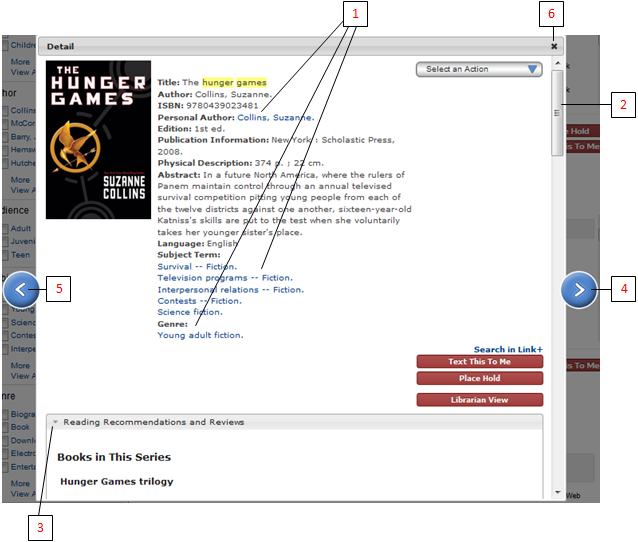
- Click on a search result title or image to view more details for that title.
- In the pop-up (Detail) window, you may see
+ Link(s), to author, subject term, or genre field (1) for example, that you can click on to begin a new search for that link's content.
+ Buttons (options), such as Select an Action, Search in Link+, Text This To Me, and Place Hold, on the right hand side, as you see on the search results page (see Working With Search Results).
+ Librarian View button, which is most useful for library staff or patrons studying library science.
+ Scrollbar (2) that you can scroll down to view the rest of the page.
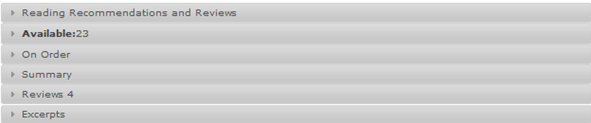
+ Collapsible detail options, which you can hide or show the details by clicking on the arrow on the left (3), at the bottom of the screen.
-Reading Recommendations and Reviews
-Available
-On Order
-Summary
-Reviews
-Excerpts
+ Forward (4) and backward (5) buttons that allow you to view the details of the next or the previous title in your search results list.
+ The X button (6) at the upper right corner that enables you to close the window when you are done with it and go back to the search results page.
Managing My Account
-
Click on My Account link at the upper right corner or My Account button on the left panel of library catalog home page (see arrows on image below).
- You will be prompted to log in if you haven’t already. Otherwise your account information will be displayed as shown on the image below.
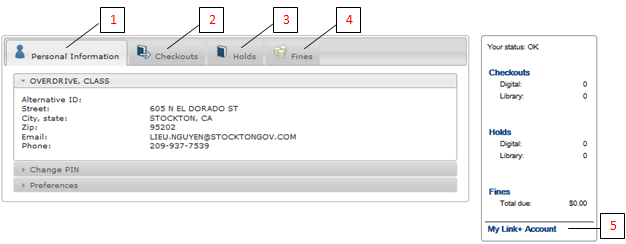
- There are four tabs on My Account page - Personal Information (1), Checkouts (2), Holds (3), and Fines (4) - and the status box on the right hand side.
(1) Personal Information tab is the default display on My Account page when you first access you account. This tab includes:
+ Your personal and contact information - such as name, address, email (if available), and phone number (if available). If any of your information changes, please contact the library to have your information updated.
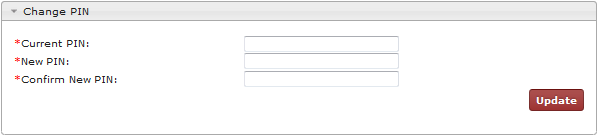
+ Option to change your pin. You must know your current pin number in order to change it.
+ Options to change Preferences in your account setting, such as
- Default Language lets you select which language you want the system to use when you log in - English (default) or Spanish.
- Default My Account Tab lets you select which tab - Personal Information (default) (1), Checkouts (2), Holds (3), or Fines (4) - opens when you access the My Account page.
- Default Checkouts View lets you specify whether the Checkouts tab displays your Digital Checkouts or Library Checkouts (default) when you first open the tab.
- Default Holds View lets you specify whether the Holds tab displays your Digital Holds or Library Holds (default) when you first open the tab.
- Preferred List - select Temporary List or any of the list titles you have created or no default list (default)
- Preferred Pickup Library – lets you select which library you would go to pick up your holds. When you add a title to your lists, the program adds it to the default list. If you select "no default list", the program prompts you to select a list. You can create a list to use as your preferred list in the My Lists page.
(2) Checkouts tab includes collapsible view for Digital Checkouts and Library Checkouts.
+ Digital Checkouts
- Displays any eBooks or eAudiobooks that you checked out from the OverDrive or Axis 360 catalog.
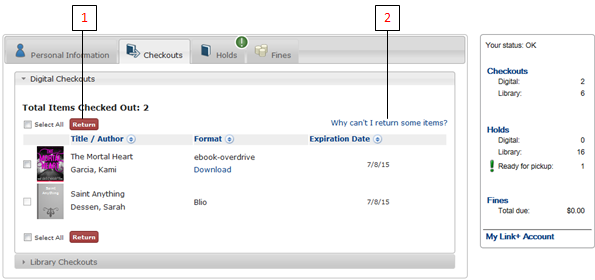
- Gives you the option to return your checkout(s) before the expiration date if possible by checking the box(es) next to the title cover image and click on the Return (1) button.
Note: If the box is not checkable, it means that the return option is not . Click on the link "Why can't I return some items?" (2) for more information.
- Has no incurring overdue fines as they are automatically returned to the library after the expiration date.
+ Library Checkouts
- Displays details- Title, Author, Times Renewed (how many it has been renewed), and Date Due - of any physical item titles that you borrowed at the library.
Note: If you have an overdue item, you will see the red exclamation mark on the Checkouts tab (see image below) and also on the left the overdue item title (1).
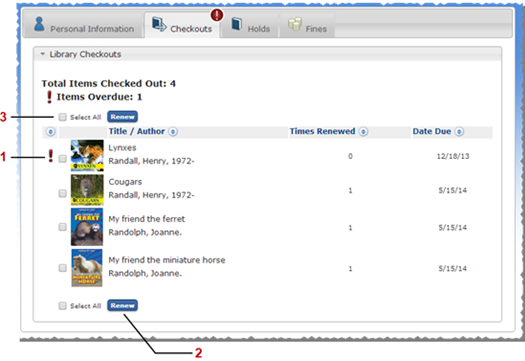
- Check the box(es) next to the title(s) and click on the Renew button (2) at the top or the bottom of your checkouts list if you need to renew any of the titles from your checkouts list.
Note: If you have overdue item(s) or overdue fines, you may not be able to renew your item(s) online. Please call customer services staff at 209-937-8221 for assistance.
- Click on the box next to Select All (3) if you want to select all the titles from your checkouts list without having to check each individual box.
(3) Holds tab includes collapsible view for Digital Holds and Library Holds
+ Digital Holds
- Displays details – Title, Author, and Place in queue (where you’re on the hold list) - of any eBooks or eAudiobooks that you placed a hold on from the OverDrive or axis360 catalog.
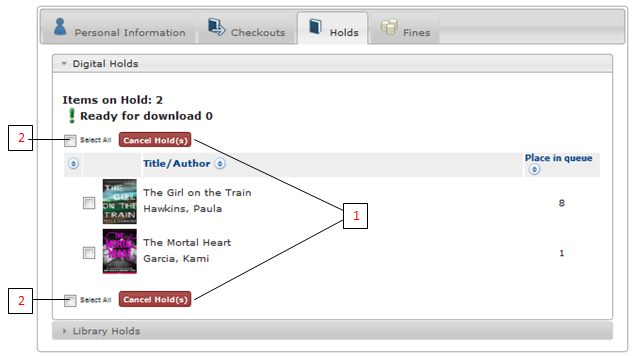
- Give you the option to cancel hold(s) that you no longer need.
- Check the box next to each title that you want to cancel the hold and click on the Cancel Hold(s) button (1).
- Check the box next to “Select All” (2) if you want to cancel all the digital holds and click on the Cancel Hold(s) button (1).
+ Library Holds
- Displays details - including Title, Author, Status, Pickup library, Expires (usually expires one year from the date it was placed on hold), and Place in queue (where you are on the hold list) - of any physical item titles that you would pick up at your preferred library.
- If you have a title ready to pick up, you will see the green exclamation mark on the Holds tab (see image below) and also on the left the title (1). Also, under the Status column, it would say “Ready for Pickup.”
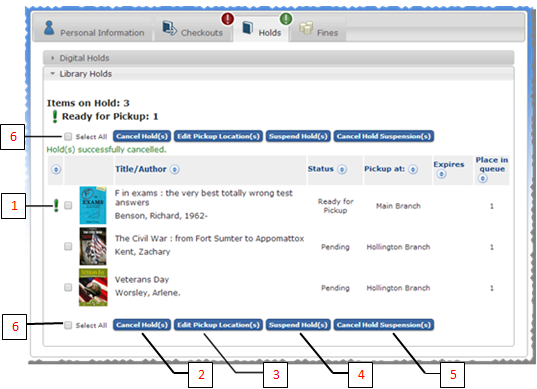
- Check the box(es) on the left of the hold title(s) and select one of the following options (buttons) at the top or bottom of your holds list to
(2) Cancel Hold(s) if you no longer need the item
(3) Edit Pickup Locations(s) if you would like to change your hold(s) pickup location
(4) Suspend Hold(s) if you’re away for more than a week and are not able to pick up your holds during that time. This option allows you to suspend your holds by placing a suspension date range on your holds so that you won’t be charged for the restock fee.
(5) Cancel Hold Suspension(s) if you no longer need to suspend your holds
- Check the box (6) next to Select All if you would like to select all the titles from your holds list, and select any one of the options (buttons) as shown on image above.
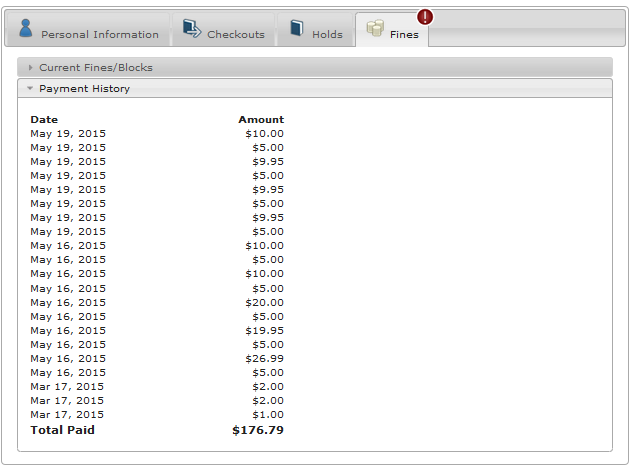
(4)Fines tab includes collapsible view for Current Fines/Blocks and Payment History.
+ Current Fines/Blocks
-Displays details – Title & the item copy’s barcode number, Reason (for the incurring fine), and the Amount due - of any current fines from any items returned late, lost or damaged and the total amount due at the bottom right corner.
Note: if there is a red exclamation mark on the Fines tab (see image below), it means your account is currently blocked or in collection. You must pay off the Amount due or contact library customer services and accounts @209-937-8221 to make arrangement for partial payments before your account is sent to collection (if the amount you owe is $25 or more).
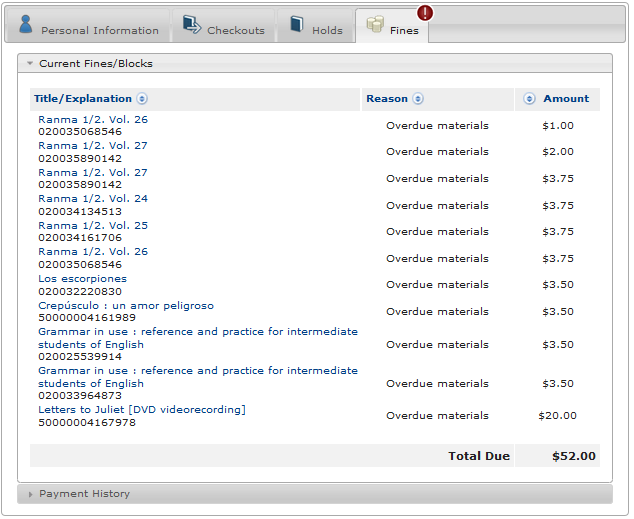
+ Payment History lists only the date(s) of past payment(s) and the corresponding paid date(s).
(5)The Summary Box
This box is located on the right hand side of My Account page. It provides details of
+ Your account overall status
- It would be OK, DELINQUENT, BLOCKED, or COLLECTION.
- If your account is either BLOCKED or in COLLECTION, you must pay off your fines before you can continue checking out or place holds on any library materials or using any library computers.
+ Total numbers of Checkouts from Digital and Library checkouts
If you have any overdue items from Library checkouts, there will be an alert of a number of overdue items at the bottom of your checkouts summary with a red exclamation mark next to it.
+ Total number of Holds from your Digital and Library holds
If you have any Library holds ready for you to pick up, there will be an alert of a number of items “Ready for pickup” at the bottom of your Holds summary with a green exclamation mark next to it.
+ Total amount due
If your account has new or unpaid fines, there will be a red exclamation mark next to the total amount, and you must pay off part of the total amount due or all of it.
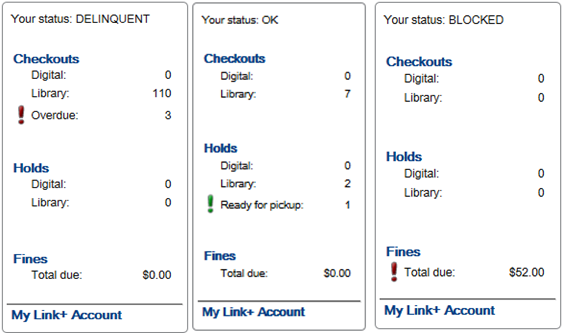
Also, at the bottom of the summary box, there is a link called My Link+ Account (see image above). If you have any items checked out or on hold from Link+, it would not be included in the summary box. Thus, the link My Link+ Account would take you to the Link+ login page where you can access your Link+ account.
Accessing My Lists
If you select the option "Add to My Lists" from the Select an Action button, the selected title(s) would be saved on either a Temporary List or a list that you have created and defaulted as your "Preferred List" from your account Preferences setting.
- Temporary List
+ If you have not logged in before selecting the option "Add to My Lists," your selected title(s) will be automatically saved into the Temporary List regardless of your account Preferences setting.
+ You can view this list by clicking on My Lists link located on the upper right corner of the catalog header.
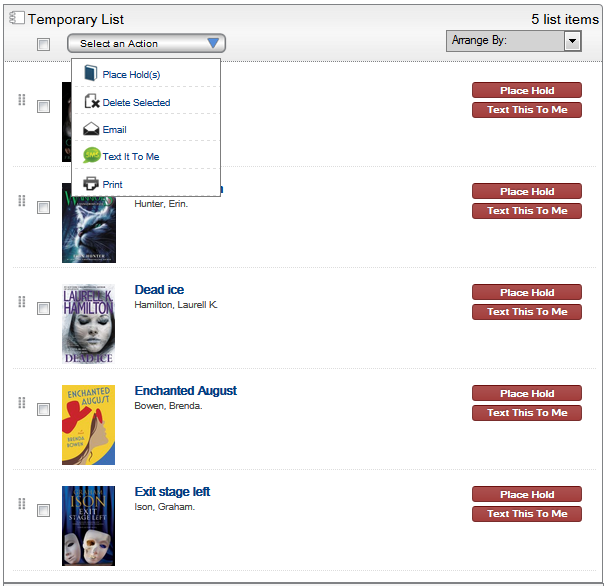
+From the Temporary List window, select title(s) from the list by checking the box(es) next to the title(s) and click one of the following options (see image below)
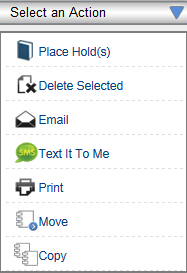
- "Select an Action" button to Place Hold(s), Delete Selected, Email, Text It To Me, or Print
- "Place Hold" or "Text This To Me" button on the right of each title
- "Arrange By:" box to sort this list by title or date (in ascending or descending order)
+ Since it is a temporary list, it will no longer exist after you close the internet browser window of the library catalog.
- Permanent List(s)
If you would like to save your selected title(s) to a list that you can create and store in your account, you must first log in.
+ Viewing My Lists
- Click on My Lists link next to My Account link to view your list(s).
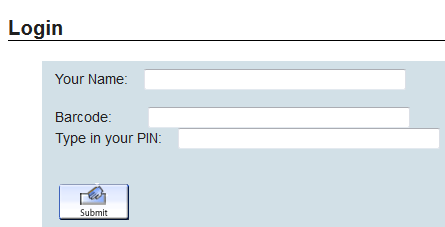
- If you have not logged in, click on the Log In link on the upper right corner of the catalog header or the “Log in” link on the right (see arrows on image below).
Note: The Temporary List will always be the default list display every time you click on My Lists link even if this list is empty.
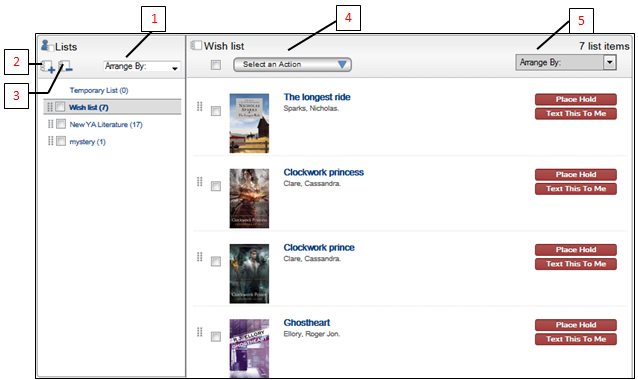
- Once you've logged in, you would see the name(s) of the list(s) that you've created (see image below).
- If you have multiple lists created, you can also sort them by name or date (in ascending or descending order) by clicking on the box "Arrange By:" (1) right above the list names.
- Click on a list name that you created (if any) on the right panel to view the details of its title(s).
+ Creating/deleting lists
- To create a new list, click the Add List button (2). A window will open and prompt you to name your new list. Enter the name and click Create to create the new list or Cancel to go back.
- To delete lists, select the lists you want to remove and then click the Delete Lists button (3).
+ Adding title(s) to your saved list(s)
-You can add item(s) from the search results page to any of the lists you created by selecting the option “Add To My Lists” from the "Select An Action" (4) drop-down menu.
-If you’ve already selected a Preferred List in your account Preferences, your selected title(s) will be automatically saved in the Preferred List, and a message window also pops up to confirm the saved title(s).

- Otherwise, you will be prompted to select a list name that you want to save the selected title(s).
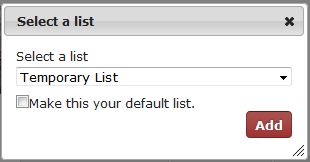
- After selecting a list from the drop-down menu, check the box “Make this your default list” if you want to add more title(s) to the same list from that point on. Doing so will also automatically change your Preferred List setting in your account to the list that you selected earlier.
- Then, click on the “Add” button. A confirmation message window will display the added title(s).
+ Selecting an option from the “Select an Action” (4) button
After adding titles to one of your saved lists, you can sort them by name or date in ascending or descending order by selecting one of the options from the "Arrange By:" (5) drop-down menu.
You can also place hold(s), delete, email, text to your mobile phone, print, or copy any title(s) that you selected from the save list(s) and move the title(s) from one saved list to another from the "Select an Action" drop-down menu (see image below).
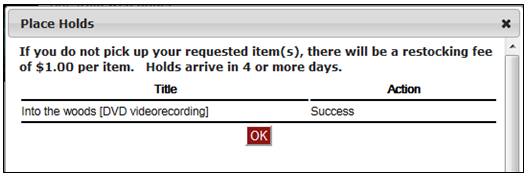
Placing Hold(s)
-
If you'd like to place a hold on any titles from the search results page, click on the “Place Hold” button on the right of each title or select the “Place Hold(s)” option from the “Select an Action” (see Selecting an action) drop-down menu for multiple-title hold.
-
The Place Holds window will pop up displaying the title(s) you request.
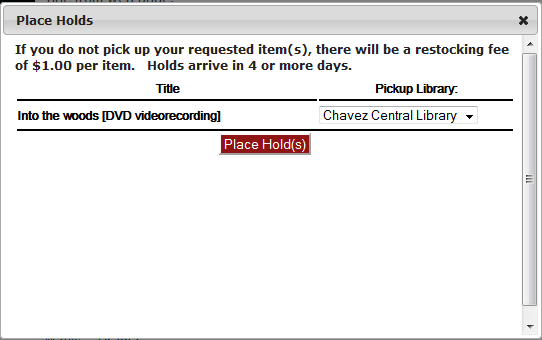
- Click on the box under “Pickup Library” heading and select a library branch from the drop-down menu if the Chavez Central is not your preferred pick-up library as it is the default selection.
-
Click on “Place Hold(s)” button to complete your hold(s) request, and a message window will pop up to confirm that request.
Copyright © Stockton-San Joaquin County Public Library. All rights reserved.
Sitemap | Contact Us | About | Press Releases


